Dream-Fresh.com

Dream Fresh

Dream Fresh

How to Screen Record on iPhone 14

Dream Fresh
How to Screen Record on iPhone 14 in Detail, we’ll lead you through the steps to screen record on your iPhone 14 with precision and ease in this complete guide. In today’s fast-paced digital world, excellent screen recording on our iPhones is more important than ever. The ability to screen record on your iPhone 14 is a valuable tool to have, whether you want to make a video conversation, record a gaming session, produce instructional, or record anything important. Please click here if you want an information about How to Find Hidden Photos on iPhone : Unveiling the Secrets

Table of Contents

Why is Screen Recording on iPhone 14 Important?

Before we get into the details, it’s important to understand the importance of screen recording on your iPhone 14. Here are a few examples of how screen recording might be beneficial:

Sharing Important Information

Sometimes, you come across critical information on your device that you need to share with others. It could be an error message, a website bug, or any other on-screen content that’s hard to explain in words. Screen recording makes it easy to capture and share this information accurately.

Creating Engaging Tutorials

If you’re an educator, content creator, or simply want to help someone understand a process, screen recording is the ideal solution. You can create engaging video tutorials that show every step in detail, making it easier for your audience to follow along.

Recording Memorable Moments

Your iPhone 14 is your trusty companion when it comes to capturing memories. Whether it’s a video call with a loved one, a gaming achievement, or a funny moment with friends, screen recording ensures you never miss those cherished moments.
Now, let’s get down to the nitty-gritty of how to screen record on your iPhone 14 effectively.

How to Screen Record on iPhone 14: A Step-by-Step Guide

Recording the screen of your mobile/cell phone Apple iPhone 14 in a video with sound can be very useful for performing a tutorial or showing an acquaintance how to perform particular tasks in an Apple iPhone 14, save in a video file, and then share or submit it to a platform like as YouTube or social networks.
Sometimes we want to record a story that we saw on Instagram of a friend, a phone chat or video call (FaceTime) with a family member to retain as a souvenir or to use as proof, or a TikTok video.
How to Screen Record on iPhone 14

To make high-quality screen recordings, carefully follow these steps:

Install an iPhone update

Before you start screen recording, make sure your iPhone 14 is running the most recent version of iOS. This will not only provide you the most up-to-date features, but it will also improve the stability of your recordings.

Control Center for Access

To access the Control Center, swipe down from the top-right corner of your iPhone screen. You’ll find a variety of shortcuts and functions here, including screen recording.

Enable Screen Recording

Press and hold the screen recording button, which looks like a circle inside a square. A menu will pop up, allowing you to enable the microphone for recording audio. You can also toggle other settings as per your requirements.
If the activated control does not display, we move down and it will appear in the “MORE CONTROLS” area; click the green + button to add it. After completing this step, we can quit the Apple iPhone 14 settings.

Start Recording

Once your settings are in place, tap the “Start Recording” button. A countdown will begin, giving you time to prepare your screen. After the countdown, your iPhone will start recording everything on the display.
If you want to record a video in your Apple iPhone 14 without using the microphone, press the recording icon, a 3-second countdown will begin, and then the recording will begin, you will see a red line at the top of the screen and the word “Recording” which indicates that everything on the screen is being recorded.
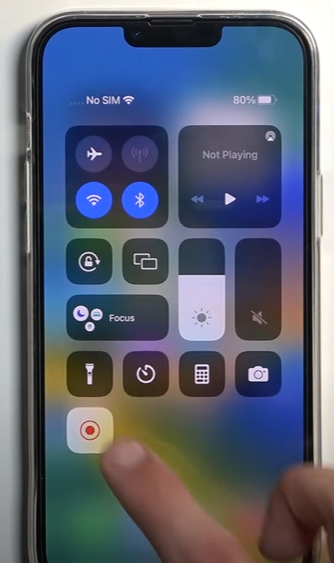
If you want to record a video using the microphone in addition to the sound of the iPhone 14, (for example, to explain the operation of an app to a friend or to record a message while recording the video from the Apple iPhone 14 screen), press and hold the button press on the microphone to activate or deactivate it, and then press on “Start recording” a 3-second countdown will begin, and then the recording will begin.

Pause and Stop Recording

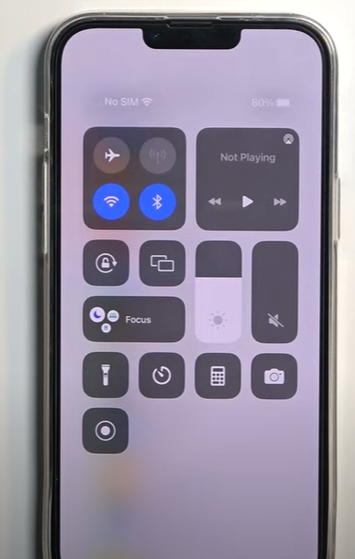
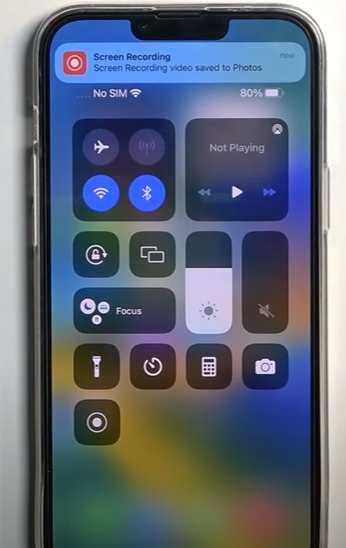
During recording, you can access the Control Center to pause or stop the recording. Tapping the red status bar at the top will also give you these options. This feature allows you to create seamless recordings with breaks if needed.

Save and Share

Once you’ve finished recording, tap the red status bar and select “Stop.” Your screen recording will be saved in your Photos app. From there, you can easily share it with others or edit it to perfection.

Tips for High-Quality Screen Recordings

To ensure your screen recordings are of the highest quality, consider the following tips:

Use a Stable Surface

While recording, place your iPhone on a stable surface to prevent shaky footage. A tripod or stand can be extremely helpful.

Clear Background Noise

Before starting your recording, make sure you’re in a quiet environment to eliminate background noise interference.

Use Screen Recording Responsibly

Respect others’ privacy and copyrights when screen recording. Only record content that you have permission to capture and share.

Edit Your Recordings

After capturing your screen, you can use video editing apps to enhance your recordings by adding text, voiceovers, or music.
By following these steps and tips, you’ll be able to create high-quality screen recordings on your iPhone 14 that are not only informative but also engaging for your audience.

Where are screen recordings saved on the Apple iPhone 14?

All screen recordings made on an Apple iPhone 14 remain in the photo gallery, both in the recent images section alongside the photos and movies recorded with the camera and in a separate folder that you can see below.
Screen recordings are saved in MP4 format.
Go to the home screen and look for the photo and video gallery icon on your Apple iPhone 14, which is a flower with different colored flowers.
You can see the screen recordings that you have made recently in recent, they also get saved in a specific category called “Screen recordings”, to see this category go down to the “Media Types” section, you will see the category “Screen recordings”, press to access and see all the screenshots taken on your Apple iPhone 14.

1 thought on “How to Screen Record on iPhone 14”

Leave a comment